
- neetlydone
- Sep 28, 2021
- 2 min read
The cable management solution you never knew you needed!

Last week I visited a friend who has been busy updating her home one area at a time over the past year. She recently had her house repainted and had new furniture delivered for her home office (the space we all need these days) and for her living and dining rooms. She asked me for input on how to accessorize her spaces to make them feel more cozy and I helped her pick out some decor pieces to do just that. As we talked through the different corners of her spaces, she mentioned that she would like a more visually pleasing solution to hide cables both in her living room but also her home office. There are plenty of cable management options out there to help manage cable clutter from plastic channels you can you attach to your baseboards to hide cords to more DIY friendly options such as modified boxes or baskets to conceal those wires.

As I searched for options for my friend, I came across an elegant solution by Luxe Design Co. A cable management box made out of wood that comes in three different finishes. I chose the black finish option and took it over to my friend's house last week to try it out. The box is a great size, large enough to house a power strip and additional cords. I especially love the magnetic close to ensure the box stays shut with no cables peeking through. The box has U shaped slots on either end for cables to enter or exit the box, keeping all that cable clutter within and concealed.

Her office is a gorgeous blue with an L shaped desk that actually converts to a standing workstation as well! The table itself had a couple of outlets for power but the cables for the monitors and laptop draped down to the floor adding to visual clutter under the desk. The room had such pretty details and the cable clutter was a detail that needed to be hidden to let the room shine.
We used the Luxe Designs Cable Management Box on top of the desk and ran a power strip from the outlet on the wall into the box. We then plugged in all the power cords from all the devices on the desk straight into that power cord having all the cables exiting the box through the slot.


Placing the box on the desk completely eliminated any cords from being visible below the desk. It was as simple as that. We adjusted the placement of the box on top of the desk to keep things neat and tidy and we even tried the box as a stand for one of the monitors to free up some desk real estate.


With this simple yet highly effective cable management solution, we eliminated entirely the mess of tangled cables that draped to the floor leaving the office with a visually clean look. It's the details that make all the difference!
Luxe Designs Co. also has a variety of other products to help with home office organization but this cable management box is certainly one of my favorites!
Thank you for reading Friends! Until next time!
Neeta
- neetlydone
- Aug 31, 2021
- 4 min read
How I modified and upholstered my old sleigh bed to turn it into a modern piece!

Once the feature wall in the guest bedroom was complete, I turned my focus to the furniture that occupied the room. I had an old bedroom furniture set that once was used in our primary bedroom at our old house. We upgraded to a king bed for ourselves and the queen bed with associated dresser and nightstand was then used for guests.
In our current home, our guest bedroom being only a 11’x12’ room needed all the available space it could get and our dated sleigh bed took up way too much room with its curved head and footboards. While it would have been quicker and easier to purchase a new bed frame, I was determined to get some more use out of the one we already had by modifying it. I decided that if I cut the curves off the bed I would gain about 6-8 inches in the room and to me that was worth it.
I had my husband use our reciprocating saw and cut the headboard down to where the wood no longer curved. I eventually did the same with the footboard. Once the headboard was chopped off, it was time to think of a way to build a new one in its place. Given the shape of the remaining bed frame, it seemed most practical to create a headboard box or sleeve that slid over the geometry of the bed.

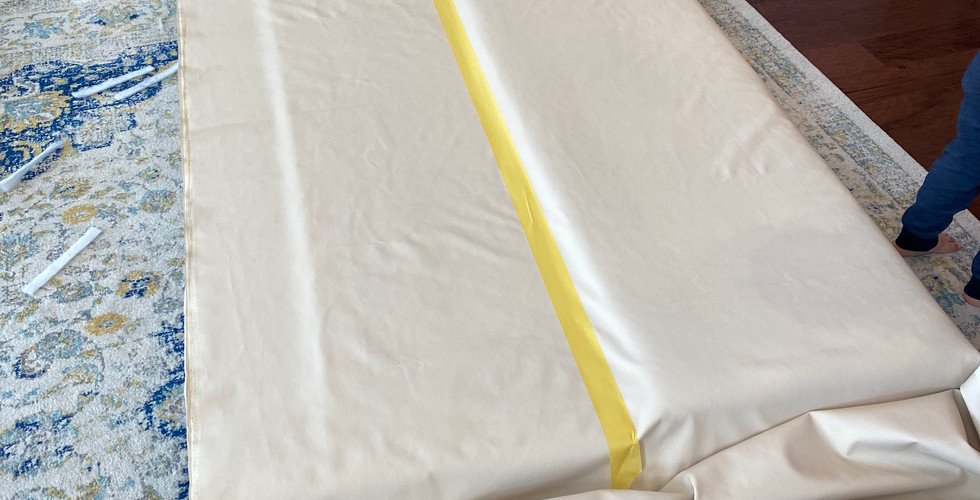
I created this headboard sleeve using two sheets of 1/2” plywood that sandwiched a 1”x 3” strip of wood on the sides and top. To keep things simple I kept the height of the headboard 4 feet which is the width of the plywood sheet and only cut the length to the size of the width of the bed. Before creating this box I added a few pieces of wood as ribs so the headboard would not flex in the middle if someone leaned on it. The front face of the headboard box needed two slots cut out so the headboard could slide over the side rails of the bed.


Once all the wood was secured with screws my husband and I did a test fit of this sleeve over the bed frame and it fit perfectly!
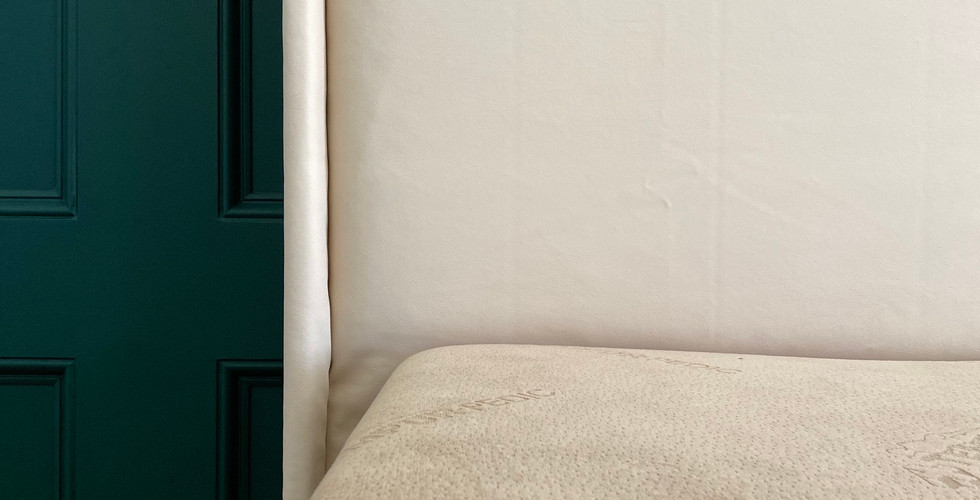
Once the foam was secured with some spray adhesive I covered the headboard in batting just to soften the hard edges before covering with a cream faux leather fabric. To secure the fabric, I wrapped the wooden box with fabric as though wrapping a Christmas present and secured the fabric to the sides and back with my staple gun. I also wanted to add some dimension to the headboard so I added 1"x 4" pine boards covered in batting and fabric and secured those to each side to create more of a wingback look. Adding this detail made the headboard look a little more detailed and finished. Once all the fabric was attached without creases, I cut out the fabric around the slots on the front face so the headboard could slide over the bed frame.


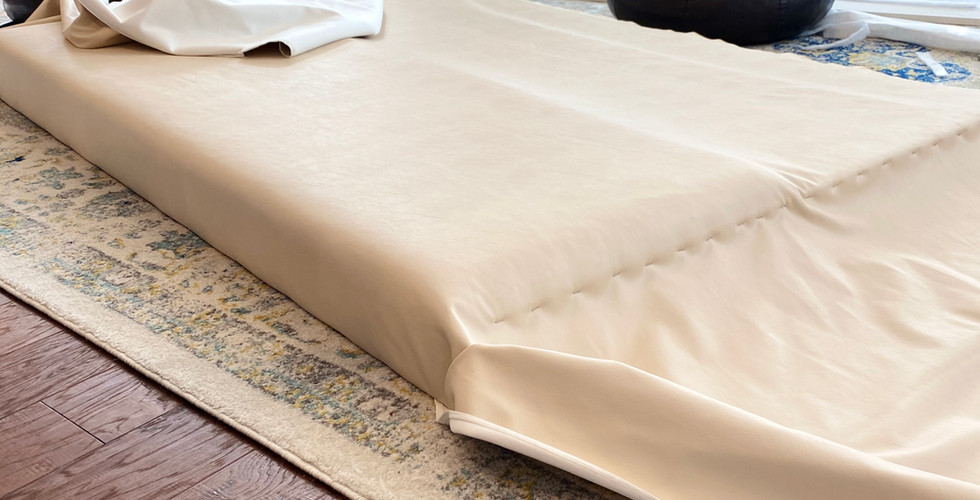
My husband and I slid the finished headboard over the bed and it was a snug but good fit. We gave it a test run and leaned on it while sitting on the bed and there was some play which allowed the headboard to move. Since I wanted it to be secure, we chose to screw the back face of the headboard to the legs of the bed at the bottom from the back. These screws are not visible when the bed is against the wall and you are looking at the headboard.


Once the headboard was complete, I had to finish the footboard. Since that was also a curved piece I cut it down with the reciprocating saw. I then capped the unfinished top with a 1"x3" pine board cut to the width of the bed. I then wrapped that wood piece with batting and then ultimately wrapped fabric around it to soften the edge and tie it in with the headboard. As a final finishing touch I added a piece of corner molding where the fabric was stapled to the wood since the staples were visible. Once I nailed the molding in place, it looked cleaner and more finished. When the bed is made, the footboard is not visible as the comforter or coverlet drapes over the foot of the bed. However, if anyone sat at the foot of the bed, I wanted to make sure that they wouldn't be met with a hard wooden edge and that it was low and soft enough to be comfortable for sitting.


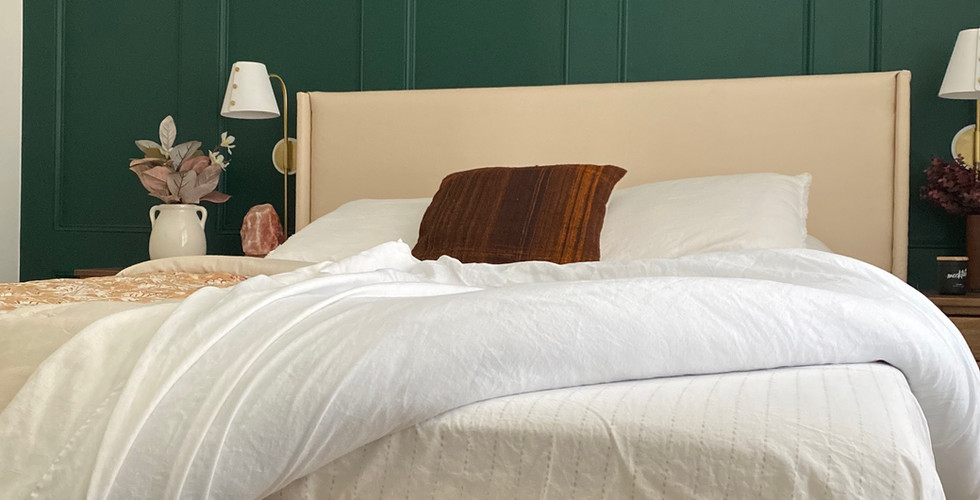


I love how this bed transformed into something that adds to the design of the room and does not take away from it. I especially get great satisfaction in being able to prolong the use of this bedroom set for a little while longer. If you are debating getting rid of furniture from your home, I hope I have inspired you to try and modify it into something you can love again. I love giving old things new purpose and saving things from the landfill and while I cannot guarantee that I will keep this bed forever, for now it fulfills its purpose and still looks aesthetically pleasing while taking up much less room in our small guest space.
As always, thank you for reading!
- neetlydone
- Aug 30, 2021
- 4 min read
How to create an elevated board and batten look

One of my first solo projects was updating our guest bedroom. Overall the room needed to function better and the furniture in the room was dated and took up too much valuable real estate. I started the room makeover by focusing on the accent wall behind the bed. When we first moved in, I had stenciled a pattern on that back wall to create an inexpensive feature but the room was now ready for an upgrade.

I chose to add wood boards and trim to the wall to create an elevated board and batten look. There are several DIYers before me that have created this kind of a feature wall however, I customized it for my space by choosing the spacing and layout of the boards. To get started, I first removed the baseboard on that back wall. I then nailed a 1"x6"primed pine board at the top of the wall all the way at the ceiling making sure to nail the board into the studs I had marked on the wall. Then, before I could add a similar plate to the bottom, I used my multi tool to cut into the baseboards on the side walls so the bottom board would have a nice notch to sit in flush to the back wall. I then nailed this board securing it again into the wall studs.

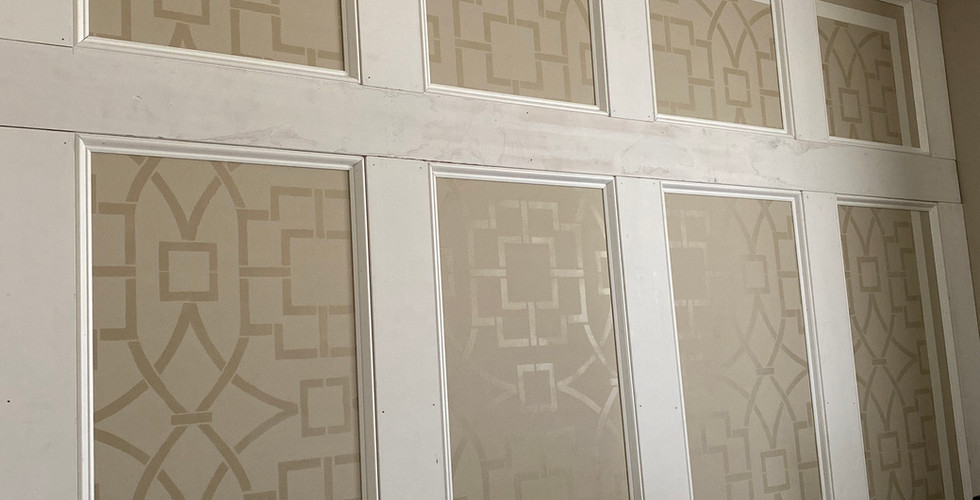
The next step is where the customization comes in. I decided I wanted to have three sections on this feature wall where the top and bottom sections were smaller and the middle one long and tall. I felt that this pattern accentuated the height of the room, even making the room seem taller than it was. Our guest room is not a huge room measuring about 11'x12' so any illusion of space is welcome. I nailed two more horizontal boards 20" from the top and bottom boards and added vertical pieces all along the outer edges of the wall creating the layout below:

At this point, I had to figure out what spacing I wanted for the vertical boards. This is particularly important if the final furniture arrangement is off center. Ideally everything is centered and the pattern will be symmetric but if the nightstands and bed are off to a side, you want a pattern that works well with not only the room layout but the furniture layout as well. I had a closet door that was a 30" swing into the room which prevented me from putting any furniture in that zone. Instead of working around that, I decided I was going to change the single closet door to two smaller doors, essentially reducing the unusable space to only 14". This then allowed me to not only add a second nightstand (my guests are particularly excited that there's a night stand on each side now) but also to center all furniture and therefore the wall pattern. I chose to create 5 sections which meant I needed to add 4 vertical boards in the top, middle and bottom sections.
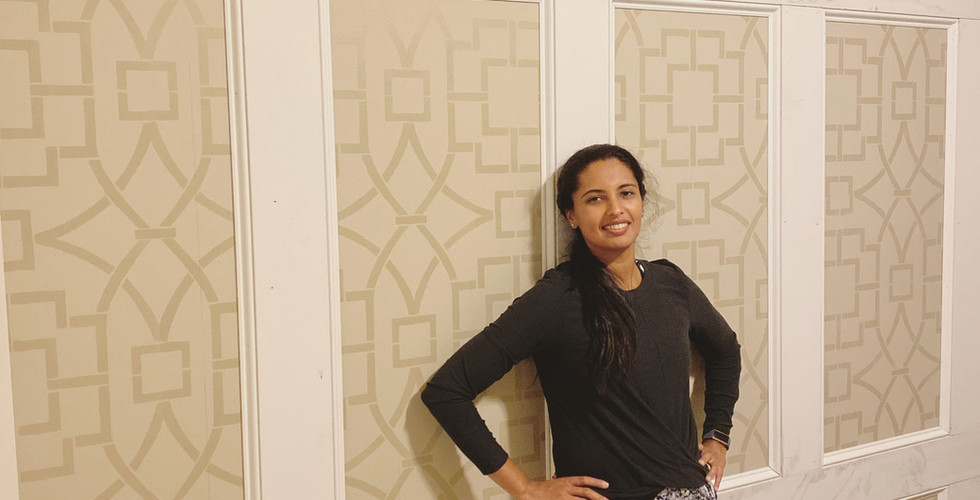
Here's me posing with a corded nail gun (with no cord attached) because after finishing all that wood work I felt invincible! Ha ha! This was one of the projects I had done before I purchased my Ryobi cordless brad nailer but if you are attempting this project and need to buy a nail gun I would definitely invest in the cordless kind. Not having to hook up to a compressor is definitely a game changer and makes starting and stopping projects that much less of a hassle.

One thing to highlight is the importance of keeping all the seams flush to each other. Drywall walls are never straight so when you nail the horizontal boards and then proceed to add the vertical ones, sometimes the boards aren't flush which only causes issues with creating a smooth finish at the end. I used folded bits of paper behind the boards that I needed to bump out a little so the joints between boards were all in line. This is important and I do not recommend skipping this step. It is much easier to get the joints aligned at the time of install using shims (in my case folded pieces of paper) rather than trying to smooth it all out using wood filler at the end.

A simple board and batten is simply horizontal and vertical boards finished with woodfiller and caulk and painted. Instead of stopping here though, I chose to add base cap molding to each of the boxes to add more detail and create more visual interest. This most certainly was a humbling experience. It took quite a few cuts (and some choice words) to finally getting the hang of cutting each trim piece to the exact length I needed. Towards the last few boxes, I was able to cut trim so precise that they stayed in place with no nails! DIY work is not always easy but you can guarantee that the more work you do, the better you'll get. You just have to start!


Once all the molding pieces were nailed in place, I started to fill all the nail holes and wood seams with wood filler. This also was no quick task. There are a lot of seams and for a truly flawless finish, which is what I was after, I had to apply the wood filler not only at the seam but fan it out enough that when I sanded the intersections, they all looked continuous like a single piece. This required a couple rounds of wood filling and sanding to get right.

The final step before priming everything was caulking the joints where the wood boards and trim met the wall and between the base cap molding and the wood boards. This eliminates any gaps and makes the wood work look professional and finished. Once all the caulk was dry, the accent wall was ready to prime. I used Benjamin Moore's Fresh Start to get everything primed and ready for paint.
I knew I wanted a bold color for this guest room, and I finally landed on Benjamin Moore's Chrome Green. It's a deep forest green that certainly adds depth to the overall room design. Check out how this wall turned out in the pictures below.


If you made it this far, thank you for reading! If you're wondering how the next phase of this guest bedroom makeover turned out check out the blog post describing how I gave our 15 year old sleigh bed a little upgrade!
