
It's All About The Trim
- neetlydone
- Apr 25, 2022
- 4 min read
Updated: Aug 3, 2022
Weeks 2 and 3 - Spring ORC 2022

Work is full steam ahead on the laundry room wrap up and I've been busy getting the finishing touches on the cabinetry. First I primed all the plywood surfaces white and that on its own made a huge difference to reduce the visual chaos of all the unfinished cabinets.
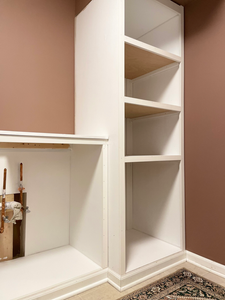
I wanted to redistribute the shelf spacing to be more practical for storing sports gear so I removed two shelves and their shelf supports and reinstalled them so I had 14" of space between each shelf. The bottom compartment is taller so I can place a laundry basket or hamper comfortably.

Now when I got to this phase at the end of week 2, I could barely contain myself. My inertia for a year was now broken and I was finally back at it.
I decided to keep going and started adding all the face trim on the tall tower. I debated building the face frame first and then attaching the entire frame to the cabinetry but I ditched the idea and chose to build in place. This cabinet build was my first and I'll be honest, I've learned a lot about building them. Given the imperfections, having a perfectly constructed face frame was likely to highlight more of my cabinet construction imperfections than hide them.
I used 1"x2" primed pine boards for the vertical pieces and across on each shelf but used 1"x3" for the top and bottom. I used wood glue where two trim pieces met and nailed the trim to the cabinet using 18ga nails. What a world of difference to cover up the raw plywood edges! However, once the face was nice and neat, the back of the cabinet stuck out as a huge eye sore.

I had a ton of shiplap scraps sitting in the garage from previous projects and had enough in the right sizes to shiplap the back of each section of the cabinet. I added a couple more support pieces to be able to nail the shiplap boards securely and made sure that the first and last piece of each row were similar in width. This required ripping down pieces on the table saw and for the bottom three sections, I had to cut notches into those end pieces to go around the shelf supports. I made sure to keep the vertical lines aligned so that the shiplap looks continuous from top to bottom making for a seamless look.
I could not be more pleased with how this turned out. Since these shelves are going to be left open, it was important to me that they looked finished even though everything will be painted the same color.
I then started trimming out the lower wider cabinet using the same process. and once that was complete I was able to add back the baseboards and quarter rounds. Once the baseboards were all continuous again, it made the laundry room seem larger. I can't explain why but it certainly took me by surprise. I guess the lesson here is never to underestimate the power of the finer details!


While I was strategizing my next move, I spent some time caulking all the things. Basically every imperfect cut is caulked and will be painted to look seamless! I then shifted my attention back to the sink cabinet and added a middle support using scrap plywood cut to size. I attached it to the cabinet with pocket holes and screws and then added a 1"x3" face trim piece to finish the edge. I used this wider trim to even out the spacing on the two sides of the added support so the doors I build can be the same widths.

Finally, the last addition for week 3 was the addition of some trim at the top of the tall cabinet to cover the gap to the uneven edge of the soffit. I still have a couple pieces of trim left to finish this up but they will likely have to be added after the countertop gets finished and the cabinets painted. For now, this laundry room is shaping up nicely but let's recap against the list I wrote up for this project wrap up:

TO DO LIST:
1. Add additional vertical support for the sink - DONE
2. Redistribute the shelf spacing in the storage tower to be more convenient for storing sports gear. - DONE
3. Add face trim to all cabinets and install baseboards to make it look built in - DONE
4. Add cabinet doors to hide plumbing under sink
4a. Paint all the cabinets, doors and shelves - Oops forgot this major step!
5. Finish the counter top - thinking faux marble with epoxy
6. Add tile backsplash above the counter
7. Install drying rods/rack for drying clothes
8. Install hooks to hold the ironing table
9. Finalize décor and reveal!
Week 4 is going to be all about building those doors and I cant wait to learn how to do something new! I think I have the process in my head straight, but I always struggle keeping my cuts accurate and getting things square! Measure twice, cut once - right?! :)
Hope you enjoyed the update and are excited for next week! Be sure to check out the progress made by the other ORC participants here:
Thanks for being here!
-Neeta


Comments